
Robot Experiment Basics: 5 Things to Decide Before You Start
Before a robot experiment, decide five things: your prediction, the one thing you will change, what to record, success criteria and how many times to run it.


AI Engineer · 36+ years in IT · Japanese, based in Manila for 13+ years
Summary
- Before you run a robot experiment, decide five things: a prediction, the condition you will change, what you will record, the success criteria, and how many times you will repeat it. Then you can judge the result fairly.
- Change only one condition at a time. If you change two at once, you cannot explain why the result changed.
- Even in a simulator, the result is not always the same every time. Write down settings such as the random seed, and repeat the same experiment several times to check.
"Robot experiment" sounds like something only researchers do. But the basic idea is the same as folding a paper airplane again and again until it flies better. I test physical AI in robot simulators and write about the results. Before every experiment, I always decide five things. In this article, I explain those five things one by one. The same thinking also works for business owners who want to avoid this situation: you brought in AI, but you cannot tell whether it actually helped.
Five Things to Decide Before You Start a Robot Experiment
First, here is the big picture in one table. The comparison is a paper airplane. The robot example is "a robot that drives straight across the floor."
| What to decide | Paper airplane | Robot example |
|---|---|---|
| Prediction | Write down "It should fly 5 m" first | Write down "It should go 100 cm" first |
| Condition to change | Change only the wing angle | Change only the speed |
| Record | Note the folding method and the distance | Keep the value you changed, the result and any errors |
| Success criteria | 4 m or more counts as a success | Stopping between 95 and 105 cm counts as a success |
| Repeats | Fly the same design 5 times | Run the same experiment 5 times |
For all five, the key is to decide them before the robot moves. If you decide them afterward, you tend to read the result in whatever way suits you. Let's go through them one by one.
1. Prediction: Write "This Should Happen" Before You Start
The first is the prediction. For example, if a robot moves at 10 cm per second for 10 seconds, the prediction is 100 cm. You write this number down before the robot moves.
Without a prediction, 98 cm and 80 cm both end up as "it pretty much worked." With a prediction written first, you notice the gap between the plan and the result. Thinking about why that gap happened is the fastest way to understand how the robot moves.
When I run a test, I follow the same order every time:
- Read the documentation to understand the mechanism being tested
- Work out a prediction by hand
- Do the same calculation in Python
- Check the movement in the robot simulator "Webots"
- Explain the gap between the prediction and the result
I made "explain the gap" the last step because you often learn the most when your prediction is wrong.
2. The Condition to Change: Only One at a Time
The second is the condition you change. Change only one condition at a time.
Say you are making curry, and you change both the amount of curry roux and the cooking time. Even if it tastes better, you cannot tell which change helped. Robots work the same way.
The baseline setting is "10 cm per second for 10 seconds," and the prediction is 100 cm.
- If you change only the speed to 20 cm per second, the time stays at 10 seconds, so the prediction is 200 cm.
- If you change both the speed and the time to "20 cm per second for 20 seconds," the prediction becomes 400 cm.
If the result of the second experiment does not match the prediction, you cannot tell whether the cause was the speed or the time. So first change only the speed and check, and then change only the time.
Move the sliders, then press the button. Try changing only one slider, then both.
3. Record: Keep the Changed Value, the Result and Any Errors
The third is the record. In my tests, I always record three things: the value I changed, the result, and any errors.
Here is an example record (the numbers are examples for explanation).
| Run | Condition changed | Speed | Time | Prediction | Result | Errors |
|---|---|---|---|---|---|---|
| 1 | None (starting point) | 10 cm/s | 10 s | 100 cm | 98 cm | None |
| 2 | Speed | 20 cm/s | 10 s | 200 cm | 196 cm | None |
| 3 | Time | 10 cm/s | 20 s | 200 cm | 197 cm | None |
With a "Condition changed" column, you can see at a glance what changed in each run.
I know from my own work with numbers how important records are. When I compare last month's numbers with this month's, I check each number's source URL and cross-check several data sources. If you have not recorded where each number came from, you cannot trust the comparison.
In one test, I ran Webots R2025a on my own computer and drove a robot by controlling its wheels. The robot moved about 19.2 cm, and I recorded both the software version and the result. With records like this, I can compare results when I run the same experiment again later.
4. Success Criteria: Decide Pass and Fail Before You Run It
The fourth is setting the success criteria. Decide what counts as success and what counts as failure before the robot moves.
Nobody sets the passing score for a test after grading the answers. If you set the criteria after seeing the result, they keep getting looser: "96 cm is good enough," "Well, it still moved 90 cm."
For example:
- Prediction: 100 cm
- Allowed difference: 5 cm either way
- Success: the robot stops between 95 cm and 105 cm
- Failure: it stops outside that range, or it stops partway because of an error
Let's also define "error" as the word is used in measurement. The glossary of the U.S. National Institute of Standards and Technology (NIST) defines measurement error as the result of a measurement minus the true value of the thing being measured. If the true distance is 100 cm and you measure 98 cm, the error is minus 2 cm. You can think of the success criteria as a decision, made in advance, about how much of this error you will accept.
5. Repeats: Run the Same Experiment Several Times
The fifth is repeating. Working well once is not enough to call it a success.
If you step on a bathroom scale once, you cannot be sure the number is right. If you step on it a few times and get almost the same number, you can relax. Robot experiments are the same. You run the robot several times under the same conditions and compare the results.
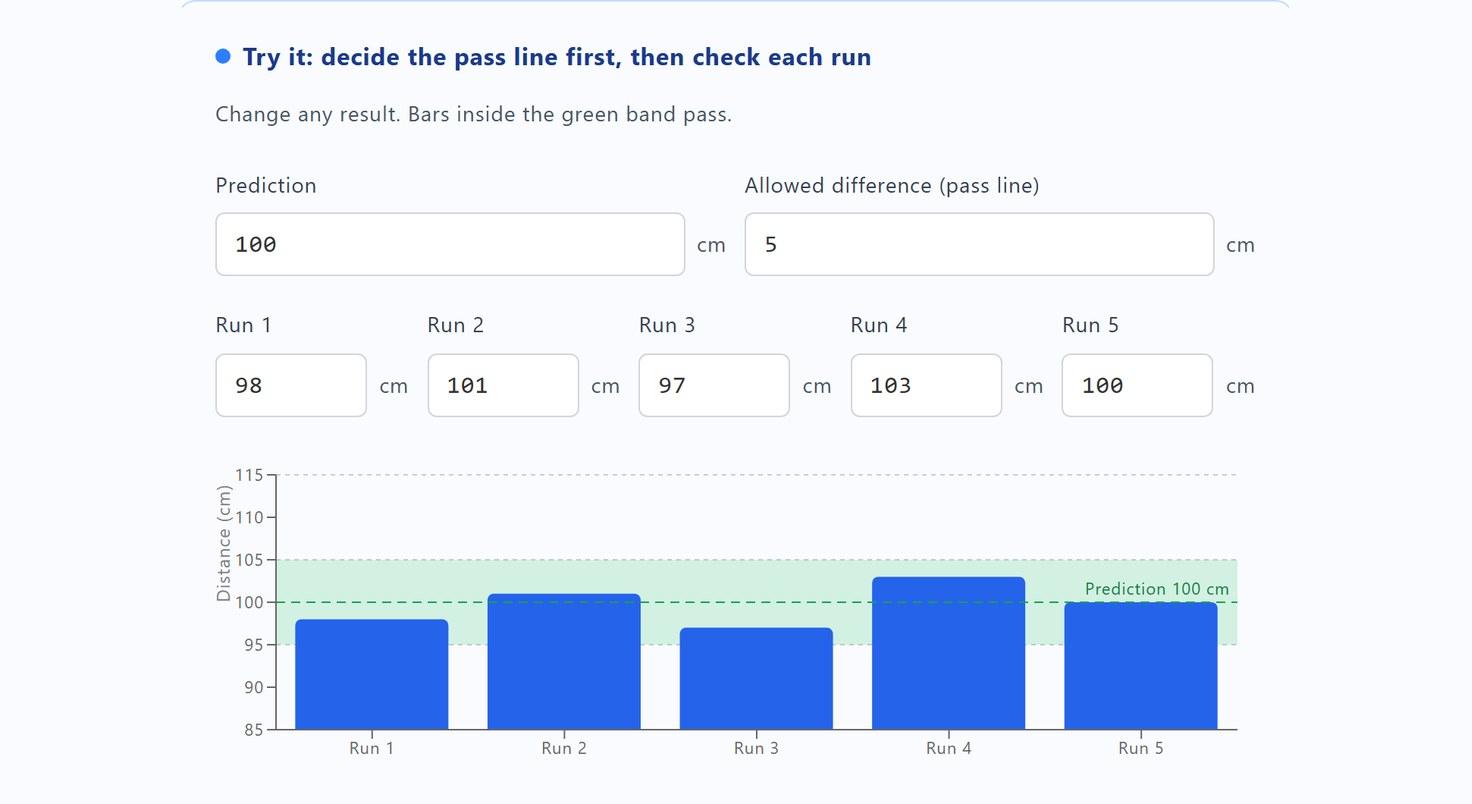
Here is an example with five runs (the numbers are examples for explanation).
| Run | 1 | 2 | 3 | 4 | 5 |
|---|---|---|---|---|---|
| Result | 98 cm | 101 cm | 97 cm | 103 cm | 100 cm |
All five runs fall within 95 to 105 cm, so this experiment passes. If even one run landed outside the range, such as 110 cm, you would look through your records to find what was different about that run.
Change any result. Bars inside the green band pass.
- Run 1: 98 cm(difference -2 cm)→ Pass
- Run 2: 101 cm(difference +1 cm)→ Pass
- Run 3: 97 cm(difference -3 cm)→ Pass
- Run 4: 103 cm(difference +3 cm)→ Pass
- Run 5: 100 cm(difference +0 cm)→ Pass
5 of 5 runs passed. Average of the runs: 99.8 cm
The NIST glossary splits the idea of repeating into two terms.
- Repeatability (repeating under the same conditions): how close the results are when you measure again and again under the same conditions. "The same conditions" means the same procedure, the same person, the same measuring instrument used the same way, the same place, and repeats over a short period.
- Reproducibility (repeating under changed conditions): how close the results are when you measure under different conditions.
The basic order is to first confirm that results line up when you repeat under the same conditions, and only then start changing conditions.
A Simulator Does Not Always Give the Same Result
You might think a simulator, which runs the robot inside a computer, gives the same result every time. But depending on the settings, the result can change every time.
You can add random variation to sensors on purpose
Webots has settings that add noise (random variation) to sensor values. For example, the sensor that measures position (PositionSensor) has a setting for how much noise to add to its output. With this setting, the sensor values change a little each time, even under the same conditions. The distance sensor (DistanceSensor) works the same way: a table in its settings sets how much noise to add at each distance. For GPS, the accuracy setting decides, in meters, how much noise is added to the position.
The "seed" decides how the variation comes out
Random variation such as noise is made with random numbers. The number that sets the starting point of those random numbers is called the seed. Think of it as the number that decides the order of the tickets inside a lottery box.
The official Webots manual says the following:
- randomSeed in the settings for the whole simulated world (WorldInfo) sets the starting point of Webots' internal random numbers, and its default value is 0. This value affects the noise pattern that some sensors produce.
- If you use a seed based on the clock time, the simulation can no longer be reproduced.
- If the calculations run on two or more threads (separate lines of work the computer runs at the same time), the simulation may no longer be reproducible.
- basicTimeStep is the length of time the simulation moves forward in one step. It is measured in milliseconds, its minimum is 1, and its default is 32.
The Python documentation on random numbers also says that with the same seed, you can reproduce the same sequence of random numbers every time, as long as multiple threads are not running.
So when you experiment in a simulator, add the seed, the number of threads, and basicTimeStep to your record. If a result differs from last time, you can quickly check whether a difference in settings is the cause.
The Same Five Things Work for AI Adoption
These five things are not only for robots. They also work when you bring AI into your business. For example, let's say you use AI to help answer customer inquiries.
- Prediction: Write down first, "Time per reply should drop from 10 minutes to 5 minutes."
- Condition to change: At first, change only the step where AI writes a draft, and keep every other step the same.
- Record: Keep the number of replies, the time each took, and the parts that needed fixing.
- Success criteria: Decide before you start that "6 minutes or less per reply is a success."
- Repeats: Do not judge after one day. Compare results over several days.
If you decide these five things before you start, you can explain the effect with numbers instead of saying "it feels somewhat easier."
FAQ
Q: Can I learn the basics of experiments without a real robot?
Yes. A simulator like Webots lets you move a robot inside your computer, so it is a good place to practice the five basics. In one of my own tests, I controlled a robot's wheels in Webots on my computer, and the robot moved about 19.2 cm.
Q: How many times should I repeat the same experiment?
The right number depends on the purpose of the experiment. The example in this article uses 5 repeats. What matters is to decide the number before you run it and repeat under the same conditions.
Q: If my prediction is wrong, did the experiment fail?
No. If you can explain the gap between the prediction and the result, you understand the robot's movement better. That is why explaining the gap is the last step in my testing process. However, if the result does not meet the success criteria, record that experiment as a "fail."
Q: Why does a simulator give a different result every time I run it?
If noise is added to the sensors, the random seed decides how that noise comes out. If you use a seed based on the clock time, or run the calculations on two or more threads, the results may not be reproducible. Recording the seed and the number of threads makes it easier to find the cause.
Conclusion
Here are the five things to decide before you start a robot experiment, one more time.
- Prediction: Before the robot moves, write down in numbers what should happen.
- Condition to change: Change only one condition at a time.
- Record: Keep the value you changed, the result and any errors. In a simulator, also keep settings such as the seed.
- Success criteria: Decide what counts as a pass and a fail before you run it.
- Repeats: Run it several times under the same conditions and check that the results line up.
These five ideas also apply directly when you check the effect of AI adoption or business automation. PH AI Works is based in Manila, Philippines, and helps small and mid-sized businesses with AI adoption, business automation and web development. If you are thinking, "I want to try AI, but I don't know how to check whether it works," feel free to reach out for a free consultation.
References
About the author
Founder / AI Engineer (36+ years in IT)
- ●From Tokyo · based in Manila for 13+ years
- ●36+ years in IT (development, SEO, AI)
- ●Google Certified AI Professional
- ●IBM Certified Generative AI Engineer
- ●AI chatbots, RAG & AI agent development
- ●Physical AI Engineer
A Japanese AI engineer with 36+ years in IT and 13+ years on the ground in the Philippines. I write from hands-on experience to help Japanese companies adopt AI that actually delivers results — chatbots, workflow automation, AI agents, and AI-driven marketing. Feel free to reach out in Japanese or English.
Your Competitors Are Already Using AI!
Is your business keeping up?
Related Articles
Robot Units Explained: Radians, Torque and Power
Learn the units in robot spec sheets: m/s, radians, rad/s, torque in N·m and power in W, with worked examples and a robot simulator test.
11/16/2026

Research, Analysis, and Writing in One Workflow
Research, analysis, and writing are three separate jobs whose handoffs now cost more than the work itself. How to run them as a single workflow in four steps, and what to measure.
8/18/2026
AI Model Vendors Now Sell Implementation Too
OpenAI and Anthropic now sell implementation support as well as AI models. What a Japanese-affiliated local subsidiary in the Philippines should decide in-house first, before choosing an AI partner.
8/18/2026
Contracting for AI While Prices Keep Falling
Write a model number into a contract and it is obsolete in six months. Learn how to design AI contracts for switching instead, with capability-based specifications, price-revision terms, and migration clauses.
8/17/2026

Building an In-House AI Team With Multi-Agent Systems
A multi-agent system is a team, and the hard part is organisational. How to define what each agent must not do, connect two agents first, and measure whether the setup actually works.
8/17/2026

Meta Cut 750,000 Under-16 Accounts in Australia
Meta removed access to over 750,000 under-16 accounts in Australia using AI-assisted age checks. What this shows about depending on one platform for reach, and what a Philippine company should review.
8/16/2026